Slicon M1 Mac에서 Lima로 Docker Desktop 대체 하기

이 글은 꽤 오래된 글이고 현재 (23년 10월) 는 OrbStack · Fast, light, simple Docker & Linux on macOS 라는 툴을 쓰는 것을 권장한다.

지난 글 에서는 Silicon Mac 을 지원하는 UTM 이라는 오픈소스 VM에 Ubuntu 를 설치하여 Docker 개발환경을 구축 했는 데, 이번에는 Silicon Mac 을 지원하는 Lima 라는 Linux VM 을 구축해주는 오픈소스를 활용하여 개발환경을 구축해 보려고 한다.
1. Lima 소개
간단히 Lima 에 대해 소개하자면 위에 언급한 것과 같이 Linux VM 를 Mac 환경에 만들어주는 오픈소스이며, 윈도우의 WSL (Windows Subsystem for Linux) 과 유사한 면이 있다.
아래 그림과 같이 기본적으로 lima는 containerd를 실행하여 컨테이너를 관리하며, 컨테이너 생성, 시작, 중지, 이미지 가져오기 및 저장, 마운트 구성, 네트워킹 등의 역할을 한다.

2. Lima 설치
homebrew 를 이용해 아래와 같이 설치를 해준다.
brew install lima docker docker-compose

3. Lima 시작하기
설치를 완료한 후에 아래와 같이 기본 명령어를 실행해본다.
limactl

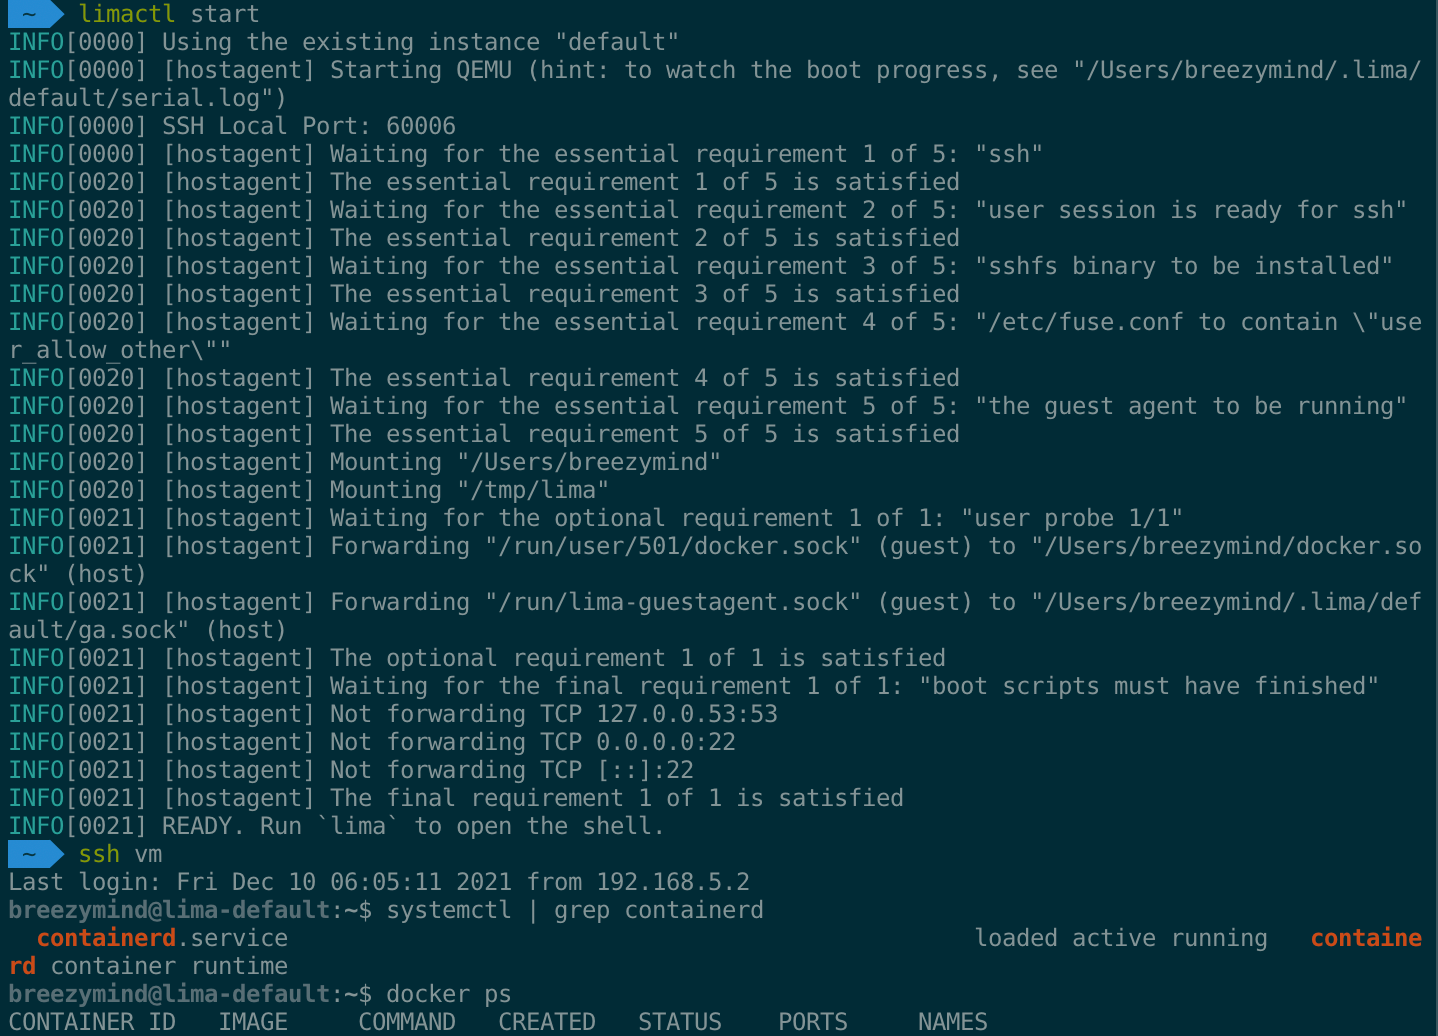
예제를 따라 기본 VM을 만들어 보도록 한다.
limactl start

위와 같이 기본설정을 따로고자 하면 아래와 같이 기본적으로 Ubuntu 이미지와 nerdctl 을 다운로드 받게 된다.

설치 완료 안내와 같이 lima 를 실행 해보면 Ubuntu 가상환경 쉘로 진입했음을 확인 할 수 있다.

4. Lima 설정하기
방금 생성한 VM 인스턴스는 아무 것도 설치 하지 않은 디폴트 상태이므로, Lima repository에서 예제로 제공하는 docker yaml 설정 샘플을 받아서 인스턴스를 생성해 보기로 한다.
1) vm instance 삭제
limactl stop default # default 인스턴스 중지
limactl remove default # default 인스턴스 삭제

2) docker config 설정으로 vm 생성
# https://gist.githubusercontent.com/breezymind/59c655d15d064cb1686a910eaa475df0/raw/ad0bcec483ed4a8c5e6f8ae5ab46bc0d94c00b86/lima-alphine.yaml
images:
  # Hint: run `limactl prune` to invalidate the "current" cache
  - location: "https://cloud-images.ubuntu.com/impish/current/impish-server-cloudimg-amd64.img"
    arch: "x86_64"
  - location: "https://cloud-images.ubuntu.com/impish/current/impish-server-cloudimg-arm64.img"
    arch: "aarch64"
mounts:
  - location: "~"
# 홈디렉토리 이하 쓰기 적용
    writable: true
  - location: "/tmp/lima"
    writable: true
ssh:
  localPort: 60006
  # Load ~/.ssh/*.pub in addition to $LIMA_HOME/_config/user.pub , for allowing DOCKER_HOST=ssh:// .
  # This option is enabled by default.
  # If you have an insecure key under ~/.ssh, do not use this option.
  loadDotSSHPubKeys: true
# containerd is managed by Docker, not by Lima, so the values are set to false here.
containerd:
  system: false
  user: false
provision:
  - mode: system
    script: |
      #!/bin/sh
      sed -i 's/host.lima.internal.*/host.lima.internal host.docker.internal/' /etc/hosts
  - mode: system
    script: |
      #!/bin/bash
      set -eux -o pipefail
      command -v docker >/dev/null 2>&1 && exit 0
      export DEBIAN_FRONTEND=noninteractive
      curl -fsSL https://get.docker.com | sh
      # NOTE: you may remove the lines below, if you prefer to use rootful docker, not rootless
      systemctl disable --now docker
      apt-get install -y uidmap dbus-user-session
  - mode: user
    script: |
      #!/bin/bash
      set -eux -o pipefail
      systemctl --user start dbus
      dockerd-rootless-setuptool.sh install
      docker context use rootless
probes:
  - script: |
      #!/bin/bash
      set -eux -o pipefail
      if ! timeout 30s bash -c "until command -v docker >/dev/null 2>&1; do sleep 3; done"; then
        echo >&2 "docker is not installed yet"
        exit 1
      fi
      if ! timeout 30s bash -c "until pgrep rootlesskit; do sleep 3; done"; then
        echo >&2 "rootlesskit (used by rootless docker) is not running"
        exit 1
      fi
    hint: See "/var/log/cloud-init-output.log". in the guest
portForwards:
  - guestSocket: "/run/user/{{.UID}}/docker.sock"
    hostSocket: "{{.Home}}/docker.sock"
message: |
  To run `docker` on the host (assumes docker-cli is installed):
  $ export DOCKER_HOST=unix://{{.Dir}}/sock/docker.sock
  $ docker ...
curl -o default.yaml https://raw.githubusercontent.com/lima-vm/lima/master/examples/docker.yaml
# m1 mac 에서는 arch: "aarch64" 로 진행하는 것을 권장함 (x86은 위 설정으로 설치시 오류가 발생한다. limactl version 0.8.0)
limactl start default.yaml
# 설치과정 살펴보기
tail -f ~/.lima/default/serial.log

3) 새로 생성된 vm 에서 docker 확인

4) ~/.ssh/config 설정하기
limactl show-ssh 옵션을 사용하면 지정한 vmd 의 ssh config 설정을 아래와 같이 가져올 수 있다.
limactl show-ssh --format=config default

해당 내용을 ~/.ssh/config 에 설정해주면 간편하게 ssh 접속이 가능해진다.
limactl show-ssh --format=config default >> ~/.ssh/config
5) Mac 에서 VM 도커 이용하기
ssh lima-default(~/.ssh/config 에서 설정한 hostname)
또는
export DOCKER_HOST=ssh://lima-default:60006
또는
export DOCKER_HOST=unix://$HOME/docker.sock

5. Trouble Shooting
1) docker-compose up 오류
다음과 같은 docker-compose 에서 registry 에 접근이 안되는 오류가 발생한다. 이런 경우는 docker-compose.yaml 에 기술된 이미지를 docker pull 받은 다음에 다시 시도하면 된다.

2) docker-compose 사용시 mount 설정 대상의 read-only 오류
# ~/.lima/default/lima.yaml 에서 마운트 부분을 확인해보고 아래와 같이 바꾼다
mounts:
  - location: "~"
    writable: true
3) mount 오류, lima v.0.8.0
-v 명령을 쓸때 마운트 하고자 하는 소스의 위치가 /tmp/lima 여야 한다. (/tmp/lima/vol 도 안됨)
docker run -it --name test -v /tmp/lima:/code/mnt -d test-app:2021122202